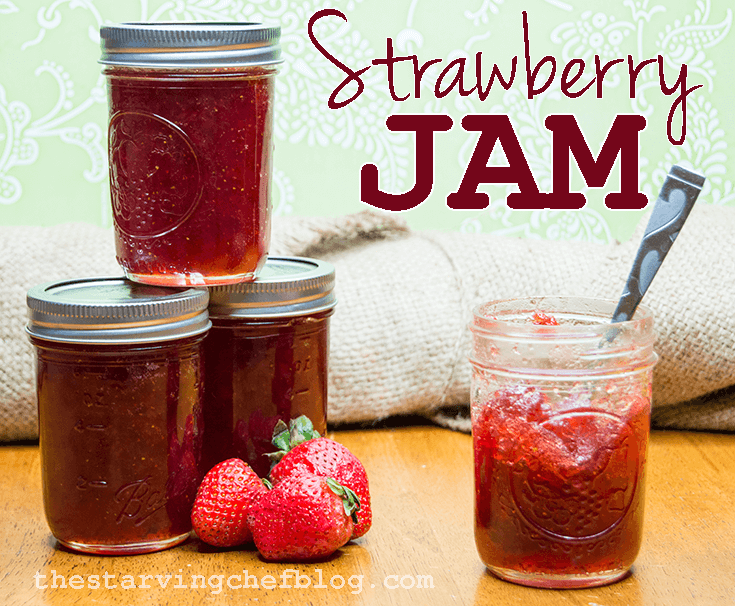
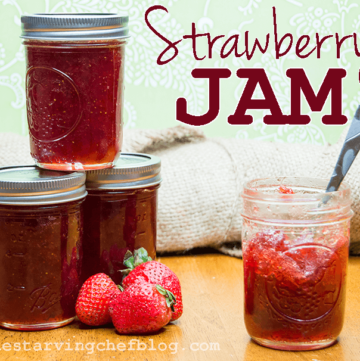
Simple Steps to Sweet Strawberry Preserve Success
The Starving Chef is supported by Hungry People like you. When you make a purchase through an affiliate link on my site, I may earn a little bit of cash on the side (at no extra cost to you) to help keep my kitchen running. Read our disclosures here.
What’s Up, Hungry People!
A few weeks ago, I treated myself to a foodie birthday extravaganza at West Side Market in Cleveland. On our way out, laden with goodies, I snagged a full pallet of fresh strawberries for just five bucks. That’s right, FIVE DOLLARS! With strawberries usually costing an arm and a leg during winter around here, I took the bait. Sure, I had no game plan for the berry bonanza waiting at home, but who needs a plan when you have strawberries?

The Decision Dilemma
I was racing against time with these berries. They wait for no one, especially not for a decision-making process. Making jelly seemed like the natural choice, considering my recent adventures into the sticky world of jelly-making, including a homemade pepper jelly (that’s right, from peppers I grew myself!). Strawberries are just wetter, right? So, off to the pot they went.
Jelly Making 101
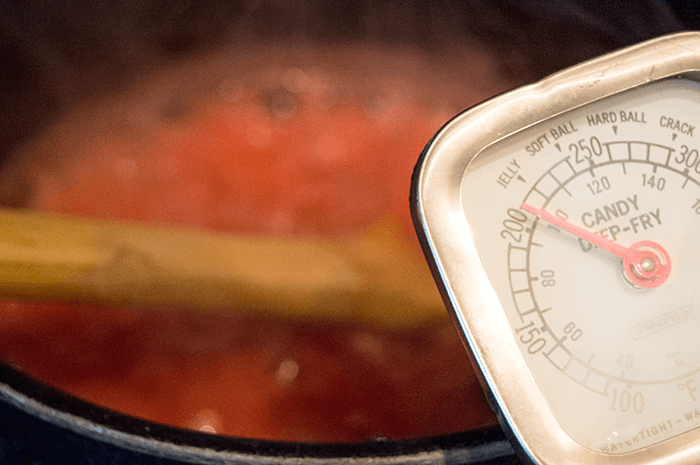
The prep was a dive into berry bliss—wash, chop, pot. In goes the sugar, the pectin, and my full attention so the pot wouldn’t turn into a strawberry scorcher. Soft jelly temp range is about 215°F – 220°F. But hey, if you fancy a strawberry river flowing over your ice cream, stop the heat at a cool 200°F for that perfect pour.
When you simmer your sugary strawberry mix, aiming for the jelly temperature zone of 215°F to 220°F is the sweet spot—literally. This range is what makes the pectin react with the acid in the fruit, turning your liquid mixture into a thick jelly that’ll hug your bread like a cozy blanket. And if you’re a rebel looking to shake things up, remember: stopping the heat at 200°F will give you a saucier concoction, perfect for crowning ice cream or smothering churros.
So, keep your eye on the thermometer and your spoon at the ready, because precision here means the difference between a spreadable masterpiece and a syrupy mess. But fear not! With a bit of practice and a lot of tasting (the best part, right?), you’ll be hitting that jelly jackpot in no time. And hey, if you overshoot and end up with a batch that’s too thick, just call it “intentionally rustic” and slather on a little extra love.
Can It, Plan It!
Let’s talk canning, the age-old method of making your foodie treasures last longer than your gym motivation. So, you’ve whipped up a batch of homemade strawberry jelly—now what? You can’t just let it sit there like a wallflower at a dance party. It needs to be canned, and here’s the lowdown on how we get it shelf-stable and pantry-ready.
Step 1: Sterilize Everything
You wouldn’t perform a swan dive into a pool without water, right? Same goes for canning—don’t start without clean gear. Get those jars, lids, and rings in a bubbling hot bath for twenty minutes. It’s like a spa day for your canning equipment.
Step 2: Fill ‘Em Up
Once your jelly hits the right gooey consistency, it’s time to cozy it into the jars. But keep it neat—leave a little headspace to let it breathe and expand. No one likes a jelly explosion.
Step 3: Seal the Deal
With the jelly in its glassy home, top it with a lid and twist that ring like you’re locking up your favorite secrets. Make sure it’s snug as a bug in a rug.
Step 4: Water Bath Time
Dunk those sealed jars into a boiling water bath. It’s like teaching your jelly to swim, but with less splashing and more sterilizing.
Step 5: Cool Down
Post-swim, lay those jars out on a towel to chill. They need to rest after all that hot water action—plus, this is when the magic of sealing really happens.
Step 6: Patience, Padawan
Give it a day or two, then you’ve got yourself some jelly that’ll last longer than your willpower at a farmers’ market. Score!
Remember, folks, canning is not just about preserving—it’s about creating something that stands the test of time. Just like those embarrassing photos from high school, but way tastier.
Can-Do Canning… Sort Of
Once my jelly reached that sweet spot, into sanitized jars it went, with a respectful quarter-inch of airspace, like a little beret on top of each jar. No “real” canning gear? No problem. I’m all about that DIY life, so a simple water bath method it was. Jars bathed in a pot, covered by an inch of water, and lifted out with trusty tongs, like a magician’s trick, ending with a towel rest on the counter.
Happy Accidents
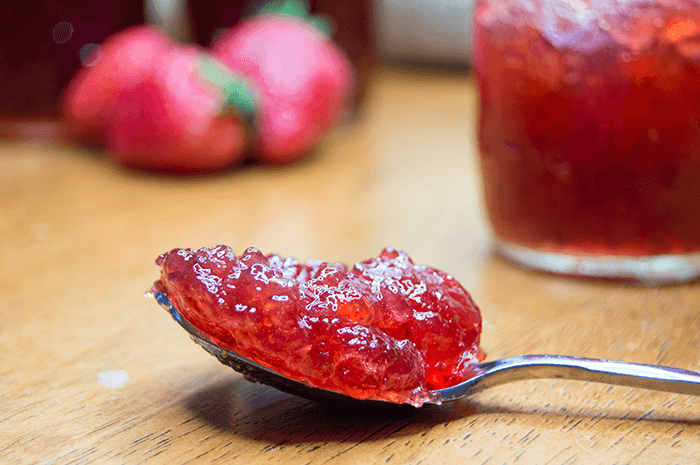
The jelly ended up a tad thicker than expected, but it’s a champ at hugging bread with ease. And because I can’t leave well enough alone, it’s starring in my next post: Strawberry Dipping Sauce for Churro Bites.

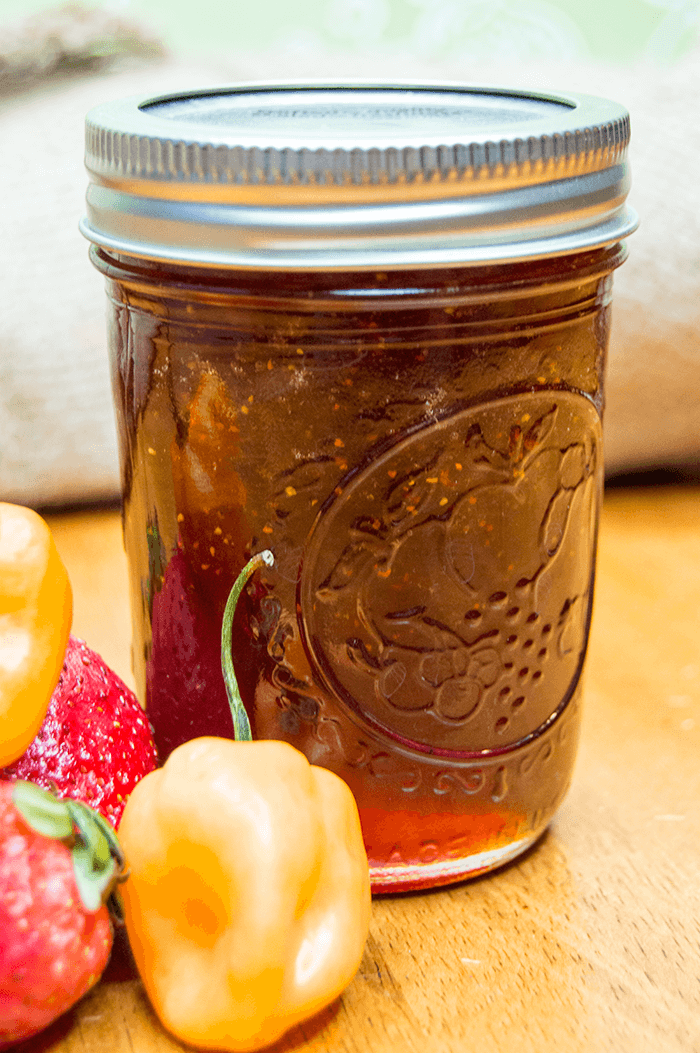
Spice It Up
Ever play with fire while making jelly? I took some pre-jarred jelly, threw caution (and two habaneros) to the wind, and let them tango for a bit. Sweet meets heat, strawberries shake hands with habanero, and bam—strawberry habanero jelly. It’s the kind of sweet and spicy that plays nice on a cracker but might kick you in the teeth. In a good way.
Strawberry Jelly Tips and Tricks
- Getting the Consistency Right: The final texture of your jelly is crucial. It should be thick enough to spread but not so firm it becomes chewy. If your jelly is too thin after cooling, don’t fret! This could be due to undercooking or measurement mishaps with pectin. You can always pour it back into the pot, add a bit more pectin mixed with a spoonful of sugar, and give it another boil.
- Sterilization is Key: To avoid the growth of bacteria and ensure your jelly lasts, sterilize all your canning gear thoroughly. Remember, this includes the jars, lids, and any tools you’ll use, like ladles and funnels.
- Prevent Crystallization: If you notice sugar crystals in your jelly, this can mean the sugar wasn’t fully dissolved before the boil. To prevent this, dissolve the sugar fully as you heat it with the strawberries and vinegar before adding pectin.
- Skim Off the Foam: After boiling, you might see a foamy substance on top of your jelly. Skim this off before canning to ensure a clearer jelly and to prevent overfilling your jars.
- Seal While Hot: For a proper seal, fill your jars while the jelly is as hot as you can safely manage. This helps to ensure that the lid seals correctly and creates a vacuum as it cools.
- Jar Filling: When filling your jars, avoid the temptation to overfill. The quarter-inch of headspace recommended is not arbitrary; it allows for the expansion that occurs during the sealing process and helps to ensure a proper seal.
- The Water Bath: Ensure the water covers the jars by at least an inch during the boiling water bath to allow for even processing and proper sealing. Don’t rush the cooling process; give it time for the lids to pop!
- Testing the Set: To test if the jelly is set, put a teaspoon of jelly on a chilled plate. If it wrinkles when pushed, it’s ready to jar.
Alright, Hungry People, after all the slicing, dicing, boiling, and toiling, we’ve got homemade strawberry jelly that could practically make bread jump out of the toaster in excitement. Whether you slather it on a slice or drizzle it over dessert, this jelly is a testament to the magic that happens when strawberries and sugar dance together in a pot. Don’t let those strawberries intimidate you at the market—snatch them up and march them straight to the stovetop.
With this recipe, you’re not just preserving berries; you’re bottling up sunshine for a rainy day. And if you’re feeling brave, remember the habanero variant; it’s not for the faint of heart but is sure to ignite a fire in your belly. Enjoy, and happy canning!
What is your favorite kind of jelly or jam to make at home? Let me know in the comments below!
Homemade Strawberry Jelly
Ingredients
- 10 cups strawberries finely chopped
- ½ cup apple cider vinegar
- 6 cups sugar
- 1 box pectin
Instructions
- Sterilize the jars, lids, and rings by boiling them in water for at least twenty minutes. Sterilize tongs in the same way. If you prefer, you can also keep the empty jars warm by placing them in a cake tin filled with warm water. This step is optional and typically done to prevent the jars from breaking when filled with hot jelly.
- Wash and chop the strawberries. In a large pot over medium-high heat, combine the chopped strawberries, apple cider vinegar, and sugar. Mix thoroughly to ensure the sugar is well distributed among the strawberries before adding the pectin.
- Once you have stirred in the pectin, bring the mixture to a rolling boil, ensuring that the temperature reaches about 215°F. Monitor the temperature carefully to prevent burning or overflowing.
- Spoon the jelly into the sterilized jars, leaving approximately 1/4 inch of space at the top to allow for expansion. Seal the jars by placing the sterilized lid on top and then screwing the ring on tightly to ensure it is airtight.
- Prepare a water bath in a large pot, adding enough water to cover the jars by 1-2 inches. Bring the water to a boil, then process the jars for about forty-five minutes or until the seal is formed, indicated by the lid not 'popping' when pressed in the center.
- Using the sterilized tongs, carefully remove the jars from the water bath, avoiding tilting them to ensure the seal remains intact. Place them on a towel on a flat surface and let them cool undisturbed for 24-48 hours until they are fully set.
- Once cooled, check the seals, label your jars, and share your homemade strawberry jelly with friends, family, and co-workers. Enjoy your creation!